Posts

Showing posts from January, 2018

Part 9: Thread wrapping practice.

Image
I've been trying different color Nylon size A thread wrappings and finishes on a 3/8" dowel... Pretty soon it will be the real deal on the line guides for the bamboo fly rods.

Part 8: Prep work for Wrapping...

Image
... the line guides.... I had to make a couple of stands today for holding the bamboo sections as I wrap the line guides. I hope to start wrapping soon.

Fly tying mess?

Image
What's your bench look like? This is mine right now, it's been worse... What's for lunch today? Leftover chicken, onions and brussel sprouts done up in the old #8 Blacklock skillet. Note the skillet cover... I needed one and picked up this nice old no-name 1950-60ish heavy cast aluminum lid for $1.99 works great ...

"Trigger Finger" ?

Image
This is going to slow me up... I strained my tendon trying to get my frozen truck door open and have what they call "trigger finger", no kidding.. look it up on the web, painful. Gotta have this on for up to 6 weeks.... great.

Stoned...

Image
Tying some of my Korn's Holiday Stone Fly Nymph's today... When I designed this fly for Parks Fly Shop I wanted to produce a more realistic stone fly nymph pattern that has lots of flash.  It was designed for visibility in high muddy water conditions sometimes found in the early fishing season on the Yellowstone River.   Materials List: Hook:  Eagle Claw Aberdeen #6   Bead: 4 mm black bead  Thread: Serafil 120 dark olive brown  Tail/Legs: black biots or natural split by ball of dubbing  Rib: nylon quilting clear thread Wingcase/shellback: pearl Easter basket mylar folded twice  Abdomen: black yarn, 3 ply.  Thorax: black dubbing  Collar: loose black dubbing  #6 Korn's Holiday Stone Fly Nymph

Part 7: First Coat... Kingfisher and the H&I fly rods...

Image
Hi folks, quick update; the first coat of finish is on both fly rods. There will be at least 5 coats of finish with light sanding in-between coats on all sections... Making progress.

Catch of the Day!

Image
Look what this guy caught... it's a beauty... He looks happy doesn't he? Dougie Zucchini Bread

Part 6b: Getting a grip...

Image
On the Horrocks and Ibbotson Featherlight fly rod by using the same process as yesterday on the Kingfisher to mount the reel seat and the cork grip.... and I think it came out great.

Part-6: Get a Grip man.....

Image
On the Kingfisher fly rod; repaired the notches with GPS thread, enlarged and tapered the 1/4" hole on the cork grip for a nice fit. Glued on the wood reel seat spacer, the Kingfisher reel seat, the cork grip and the winding check.... it's starting to look like a fly rod. Tomorrow, do it all again on the A and I fly rod... after the grips then the finish is to be applied to all the bamboo sections. Finished grip section on the Kingfisher...

Fly Rod Rebuild Series - Replacing old parts with new...

Image
Well folks, for those following this series on the rebuilding of these two old fly rods...  The parts are here, the parts are here! Cork grips, bamboo finish, guides, tip tops... etc.  For those asking I have about $140 invested total so far in the two rebuilds... The reel seats have both been cleaned and lightly polished and will be re-used. The next step is to apply 5-6 coats of finish on all the bamboo sections. Stay Tuned.

Cast Iron Cornbread

Image
I made a side of cornbread tonight with chicken and broccoli... no one objected.

Beetles get no respect...

Image
I've been tying dozens of these beetles this week.... People underestimate and under-utilize this little fly, but it sure catches a lot of fish for me here in NY and out in Yellowstone Country.... Give this little bug a try.... Parks Fly Shop Beetle :   The PFS version of the popular foam beetle differs from others in two major ways.  First, we tie it in brown and olive as well as black.  Second, we delete the legs, which on most commercial beetles are stiff and don't move well, and tend to make the fly tip over on its side.  Based on the fact that we sell thousands of these a season, it seems to make a positive difference.   Hook : short shank dry fly, #14-18  Thread : 8/0 black, olive, or brown  Underbody: peacock herl or Ice Dub  Overbody : black, olive, or brown 2mm foam  Indicator : bright foam. #16 Beetle

More of my cast iron cooking...

Image
Just Christmas leftovers tonight..... Prime Rib...

Fly Rod Update 5-Jan-2018

Image
Both fly rods have been stripped of the old finish. Ferrules have been repaired and cleaned up and are proper.  Parts have been ordered today... Both rods get new complete sets of hardware; stripping guides, snake guides and tip tops. New cork grips, winding thread, epoxy and rod finishing supplies are on the way to the shop. H and I, 8 1/2', 3 piece with 1 tip... Kingfisher, 8 1/2', 3 piece with 2 tips... one is short and was broken in the past. Butt section on the Kingfisher, unfortunately someone put crimp marks on all of the corners of the bamboo at this location, not good. This could weaken the rod and pieces of the bamboo could split off here. I am going to fill the indents with some more Gel Spun thread wraps to bring it up to level and then I'll do a decretive wrap to cover it. Only you and I will know...

Cast Iron Brussel Sprouts...

Image
Here's one of my favorites..... Brussel sprouts, done right! Slow roasted in the oven with bacon and onions, then finished on the stove top.... Tonight with left over meat loaf, fried in another #8 cast iron fry pan.

Kingfisher Ferrule Repair?

Image
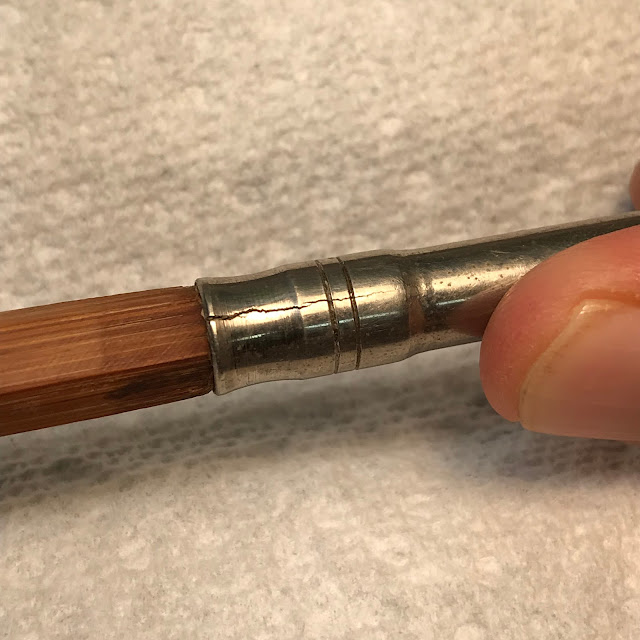
Today's project was to "try" and repair the Kingfisher's butt section's cracked ferrule. Background: A fellow turkey hunter and good friend gave me these two fly rods in the hopes that I could bring them back to life. When completed, I will get to keep the Kingfisher and he gets the Horrocks and Ibbotson Featherlight. Update: Both rods cleaned up nicely. The varnish stripper did it's job with 3 coats and a bunch of wiping and scrubbing with rags and a tooth brush. But in the end the bamboo is in nice shape and all sections look good. There was just a little thread dye that had bled into the bamboo from some of the original guide wraps that I could not remove and I can live with that. All the ferrules are okay except for two on the Kingfisher.... One has to be remounted and realigned, not a big deal, but the other is cracked badly on the butt section. Right or wrong I decided to take a "crack", pun intended, at fixing it. And since it was on the

Stripping the old varnish...

Image
I have removed all the old line guides and split the old wraps from both fly rods and layed on the first layer of varnish stripper today. I think they will need about 2-3 coats of stripper and some scrubbing to remove all of the old varnish. I hope to have these rod sections ready by the end of the day for new finish sometime this week. All of the ferrules will also need to be cleaned and/or replaced, as at least one is cracked.